| HOW TO CREATE A DECKLE EDGE |
 |
|
Perhaps one of the greatest draws to old paintings on paper is the rough, rustic edge created by tearing the paper apart instead of shearing it straight with scissors or a paper cutter. In today's era of Giclée fine art prints and large rolls of paper, the deckle edge has been largely forgotten. Where artists used to float frame their artwork (centering it in a larger frame with the edges visible) so the edge became part of the display, today mats and tight, clean framing have largely done away with this style.
This article outlines the history of the deckle edge, and explains a few techniques for creating your own edge on your prints or original paintings.
For more information on float framing your art, see our article on Mounting Art in a Frame.
|
SUMMARY
| THE DECKLE EDGE |
CREATING BY HAND |
TOOLS FOR QUICK EDGES |
ORDERING YOUR PRINTS |
| Unavoidable prior to the 19th century, deckle edges later became a symbol of an "authentic" book/paper. |
By scoring the paper along a straightedge, creasing, and gently tearing it, a deckle edge can be easily achieved. |
Deckle edge scissors and rulers make it easy to create a deckle edge. |
We suggest ordering one size up in order to have a 2" border around your prints. This will make it easier to create a deckle edge. |
|
| A BRIEF HISTORY OF THE DECKLE EDGE
|
|
|
Until the 19th century, the rough edges of book pages and other sheets of paper, was unavoidable, and probably an irritation to hard-working printers and paper-makers.
Once the method of making separate pages had been fine-tuned enough to leave the edges smooth and straight, the deckle edge became something of a status symbol, a representation of the "Real Book."
Though not technically the same as a deckle edge, uncut pages in old books did create a similar look. Books were once assembled by folding a length of paper and binding along the open edge. Due to pages lined up unevenly, or a poor blade, these books often had a few pages still connected to one another along the short edge, perpendicular to the spine. To open these pages, the reader was required to use a penknife and draw it along the fold, which often left a rough edge.
|
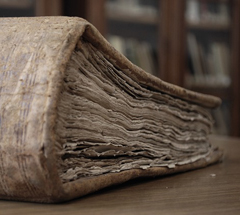
Deckle edged book
|
| CREATING A DECKLE EDGE BY HAND
|
|
|
If your print or original is on the right kind of paper, it is quite simple to create a deckle edge to give your artwork that authentic, antique look.
In general, the thicker the paper the more extreme your deckle edge will be. A sheet of basic bond, 20 lb paper with create a fuzzed edge, but lack those attractive paper fibers that create a realistic deckle.
In the realm of thick papers, cold press - textured - paper works best. This seems to be due to the delicacy of the fibers, which is required to give the paper that bumpy, soft feel. Cold press papers are also a more "traditional" paper style, the kind that would have had deckle edges in centuries past. Hot press - smooth - papers work as well, though the crease is more difficult to tear, and can give a rougher, more deliberate edge.
DECKLE EDGE BY HAND
- Determine where you want your edge to be. Since you will be folding and tearing the paper, your edge must be set in from the existing edge of the paper - an inch or more will make this process easier, though it is possible with less.
If you are using a print, you may want to have it printed with crop marks. Cut through the crop lines with a utility knife, so you can see where they are on the back side of the paper. If you don't have crop marks, you can cut or poke holes through the paper at the corners. Be sure to measure so the border is even on each side of the image.
- Turn the artwork over so it is lying face down. Put a protective sheet beneath the image, or make sure the surface is very clean. You should be able to see the corners you marked with the utility knife from the back side of the paper.
- Place a straightedge or ruler across the paper, connecting the marks on either side. Run the back side of the utility knife along the straightedge. You don't want to cut right through, just break up the fibers on that side of the paper.
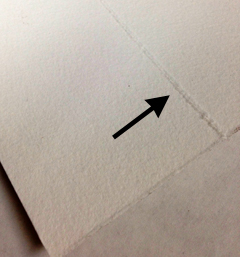
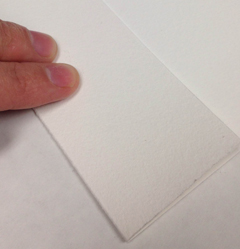
- Fold the paper along the line you just made so it folds onto the image side. Crease it well, but be careful not to create a second score mark with your nail or tool.
- Fold the paper along the line again, so it folds onto the back side of the paper. Now stop. Don't keep folding back and forth, because the easier you make it to rip, the less rough your edge will be.
- Flatten out the paper again. Placing your non-dominant hand on the face of the print (you may want gloves), use your dominant hand to carefully begin pulling the paper apart at the crease. Make sure to pull out and away, not up, and don't try to tear it along a table edge. Go slowly so the paper fibers are gently pulled apart - this will leave you more of those nice little strands.
- And that's it! Repeat the steps on each side of the print to create your very own vintage deckle edge. After all that hard work, you'll want to check out our article on Mounting Art in a Frame. We explain how to float mount your art so the edge is visible and becomes a part of the piece.
There's another relatively simple way to create a deckle edge. if you know that your paper has been sized - meaning it is now water-resistant. If this is the case, you can simply draw a line of water along a straightedge using a fine brush, let it soak in a bit, and then tear along the line. This doesn't work on all papers, so be sure to try it on a scrap piece before your print or original.
|
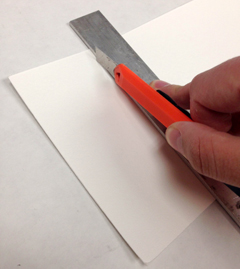
Score the paper with the back of the knife
The score mark breaks the fibers but does not cut through
Fold along the scored line, once on each side
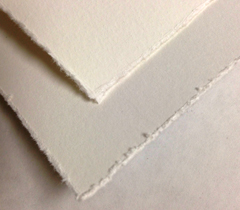
Deckle edges after tearing
|
| OTHER TOOLS FOR CREATING A DECKLE EDGE
|
|
If you can't or don't want to use the method outlined above, there are some tools that can create a similar effect.
Deckle Edge Scissors
If you're an old hat crafter, you may remember the patterned edge scissors that were popular years ago, to create everything from zig zag to heartbeat to arched edges. A deckle edge pair also exists. While the cut will be fairly smooth, without the signature, fuzzy fibers, the result does give an uneven, "torn" look to the paper edge.
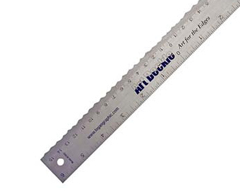
Deckle/Straight Edge
Art supply brand Logan has a tool called the "Art Deckle," which is essentially a ruler with one regular, straight edge and one rough "deckle" edge. By tearing the paper along the rough edge, the artist can easily create a deckle edge. Unlike the hand method above, this edge will be a bit more uneven, with the peaks and valleys being more disparate.
Logan appears to no longer offer this tool, though they may still be available through other retailers, and no doubt other brands offer a similar product.
Dual Edge Ripper:
This tool is similar to the Deckle edge ruler, except both sides of the clear, hard plastic strip have a rough edge along which the paper can be torn. The device offers three different edges: classic, original, and extreme, and each Ripper has two of them, one on each long edge. The results of the Ripper appear to have a bit more distinction between valleys and ridges than to the other tools mentioned above. To see the product details: click here
|
Deckle edge ruler

Dual Edge Ripper
|
| PRE-CUT DECKLE EDGE PAPER
|
|
|
Another alternative to creating your own deckle edge is to purchase printer paper that already has a deckle edge.
Various brands including Hahnemuhle, which we use here at KeenART Media, offer this type of paper. The existing rough edge saves you the time and effort of having to create it yourself, and it is formulated to pass through the printer without jamming (which might happen if you tried to print on paper you had torn yourself).
The downside to pre-cut deckle edge paper is the size limit. Since you want to preserve the edge, you must use the paper in the size it came in - no trimming or cropping. As such, you are limited to the sizes provided by the company.
Hahnemuhle offers their smooth Photo Rag, and textured Museum Etching and William Turner papers with a pre-cut deckle edges in 3 different sizes:
|
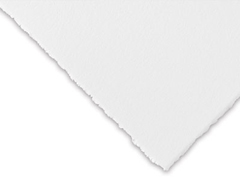
Pre-cut deckle edge Hahnemuhle Photo Rag
|
| ORDERING YOUR PRINTS WITH DECKLE EDGE IN MIND
|
|
PAPER TYPE
At KeenART Media, we offer high quality ink jet prints on a variety of fine art papers. If you are planning to create a deckle edge on your prints, you will probably want to order our German Etching or William Turner watercolor paper. These thick, textured papers will produce the best result.
Our Hahnemuhle Fine Art and Baryta papers work as well, though the deckle edge will be more subtle. Photographic papers may also work, with a similar result.
We are happy to supply test strips of any of our fine art papers for you to experiment. Please contact us to discuss samples.
PAPER SIZE
We leave a one inch border around all our fine art prints, with optional crop marks if requested. If you would like to deckle the edges of your artwork, we recommend adding two inches to the size of your print, and making a note in the order form to let us know.
For example, if your print is 8"x10", order a 10"x12" print, but tell us you want a 2" border and still only an 8x10" image.
As mentioned above, it is possible to create a deckle edge with less than an extra inch around the border, but the less paper there is to remove, the more difficult the process becomes.
|
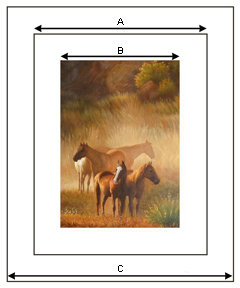
A: Original paper edge, 1" on each side of 8x10" print
B: Print size: 8x10"
C: Paper edge if ordering one size up. Image size still 8x10"
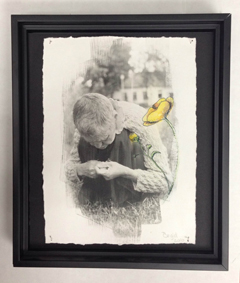
Deckle edge print in a floater frame
|
|
Order your Fine Art Prints today, and use a deckle edge to give them a unique, old fashioned feel.
If you have any questions about any of the products or services offered here at KeenART Media, please do not hesitate to contact us. Our knowledgeable staff are always happy to answer your enquiries and provide suggestions or advice.
Want to see some great examples of deckle edged art? Check out our Pinterest Page!
|
|
© 2002-2026 - KeenART Media Ltd.
|
|
| |
|