| MOUNTING ART IN A FRAME |
 |
|
Mounting artwork in a frame may not sound like a complicated process, but there are many facets and options to consider.
You may be wondering why it matters how you mount your artwork for framing. Tape the corners, glue it down, who cares? In fact, it is very important to properly mount your art. Professional mounting techniques, while not necessarily complicated, are essential to keeping your artwork flat and centered in the frame.
This article outlines the different methods for displaying paper prints and original art in a picture frame, to ensure you get the best result and end up with a beautiful, professional-looking piece of decor. As long as acid-free or "conservation" materials are used, all the methods listed below are archival (reversible without damaging the art), unless otherwise stated.
|
SUMMARY
| MAT OR NO MAT? |
HINGING METHODS |
FLOAT MOUNTING |
OTHER MOUNTING METHODS |
| A mat can add to an artwork, but is not essential. Whether or not you choose a mat will depend on the size of your artwork and frame, and the style you wish to display. |
This mounting method allows the artwork to expand and contract with the changes in temperature and humidity over time. |
You can choose to float mount rather than mat your artwork. There are two styles: flush float mounting, and raised float mounting. |
Photo corners, mounting strips or tabs, or full adhesion are alternate methods of mounting artwork. |
|
| SHOULD I USE A MAT?
|
|
A mat is a useful addition to a framed artwork for a number of reasons:
- The blank, often white, space it creates between the frame and the artwork draws the eye, and brings it back in when it reaches the edge.
- A well-chosen color can draw out subtle hues in the artwork, adding to the viewing experience.
- The mat will separate the art from the glazing (glass or acrylic), protecting it from moisture that may accumulate, or other damaging issues caused by direct contact.
Depending on your artwork, it may be easier to mount with a mat than without. Frame size is another consideration, however. If you have a specific frame in mind and your print is precisely that size, a mat will not be an option for you. If you have not yet chosen a frame, consider a mat for your artwork and then select a frame accordingly.
For more information, see our related articles:
MOUNTING WITHOUT A MAT
If you have an artwork that is the same size as your frame opening, you do not need to hinge or mount it to the backing board in any way. If the piece is surrounded by a white border, ensure you trim this before measuring for the frame, or make sure the lip of your chosen frame is wide enough to cover this section.
Some prints come with enough surrounding white space to serve as their own "mat." This is another, optional way to display the art.
|
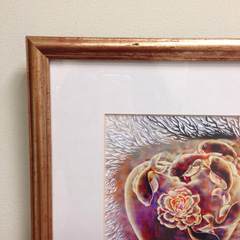
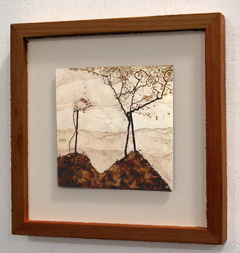
A mat creates space between art and frame
|
| HINGING THE ARTWORK
|
|
|
The ideal way to mount your artwork for framing - and the method most professional framers use - is hinging. As the name implies, this technique involves fastening the artwork to the backing or mat with a "hinge" at the top end only, so the art otherwise hangs loose within the frame.
Hinging is used to prevent buckling or creasing over time. The paper, as well as the backing and mat, will expand and contract over time due to humidity and temperature changes. Different types of paper shift at different rates, so if the entire piece is fastened down, with tape at each edge, or glue around the edge, this shifting can cause the art to buckle, crease, or even tear.
If proper hinging tape is used, this process is archival, which means the artwork can be removed without any damage, and the adhesive will not damage the art while it is attached. Traditional hinging tissue was not self-adhesive, but required the application of wheat paste (a natural glue), which could then be removed with mineral salts dissolved in water. Today, self-adhesive hinging tissue is more common. It is removed the same way, but does not require wheat paste.
HINGING ARTWORK TO THE MAT
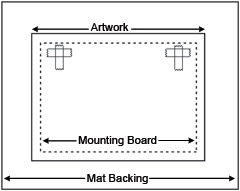
- The back of the artwork will be fastened to the back of the mat with a single piece of tape or hinging tissue. This piece should be about 1/5th the total width of the artwork. This will be enough to keep the weight of the paper from pulling free or tilting.
- Make sure the artwork is centered behind the mat so the opening is showing exactly what you want - namely, the white border around the print is hidden. Place your tape in the in the top center of the artwork, with half on the artwork and half on the back of the mat. Press to firmly adhere.
- It is also possible to hinge your artwork to the backing board, and simply place the mat on top. If for some reason you cannot turn your artwork face-down, this may be the preferable method.
- Your artwork should now hang freely, fastened only in this one place. Once you have placed it in the frame and it is pressed between the mat and the backing, it will lie flat, with no gap between mat and art.
| 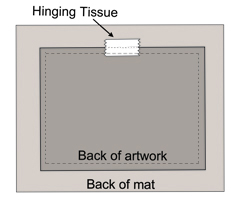
Attach the back of the art to the back of the mat.
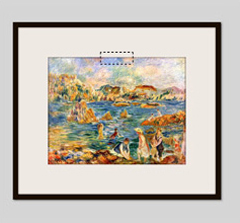
Front view of a hinged, matted artwork
|
| FLOAT MOUNTING WITHOUT A MAT
|
|
|
Float mounting involves displaying the full artwork in a frame, with the edges visible. This method is most commonly used if the artwork has a detailed or deckle edge.
There are two float mount options:
- The artwork can be affixed to a backing that will be visible around the art, similar to a reverse mat.
- Or the artwork can be sandwiched between two panes of glass or acrylic, so the wall on which it is hung is visible within the frame.
Both methods use the same mounting technique; in the second method the mounting board or backing is the second pane of glass. Also in both cases, you have the option to raise your artwork off of the backing, so it creates a shadow effect.
Backing
Although you are not using it as a traditional mat, option 1 does use matboard as the backing. This allows you to choose any color to create a background for your image. Because matboard is quite flexible, you will still want a second, more rigid foam board, carcboard, or wooden backing behind the mat.
Frame
Though any frame can be used for a float mount, a shadow box is often the most successful. These frames have a deep rabbet and when frame spacers are placed between glass and backing, create an attractive, shadowed gap between glass and artwork.
FLUSH METHOD
If you have deckle-edged print, or a paper that is already wrinkled or textured, you may not feel the need to raise it off the matboard. In this case, you will simply use double sided tape (for inexpensive, short term projects) or hinging tissue to affix the artwork to the matboard.
- Cut your chosen matboard to the size of the frame opening. Center your artwork on board and mark on the mat just below the top corners, so you know where to place your artwork.
- Apply the tape or tissue in each top corner of the artwork, about 1/4" down from the edge. (Since there is no mat holding the artwork down, a single center piece may be too weak.
- Place the artwork down on the matboard, pressing firmly to adhere the adhesive to the mounting board. Leave it lying flat for a few hours to ensure adhesion. You may place a clean piece of paper and then a heavy book on top, if this will not damage the artwork.
- Once the hinging material is fully secured, place the artwork and mat face down into the frame, followed by the backing.
RAISED METHOD
The raised method is carried out in much the same way as the flush method, the difference being instead of hinging the art to the frame-sized mounting board, you will hinge it to a piece of foam core or matboard that is cut slightly smaller than the artwork (about 1" off each dimension). The hinges will be lower on the artwork so they can adhere to the mounting board, but otherwise the process is the same.
Once the hinges have dried, you can glue the mounting board to the frame-sized matboard, and place the contents in the frame. It is especially important to have a more rigid backing for a raised float, due to the added weight of the mounting board.
V HINGES
V hinges, also called a hidden hinge, are another way to float mount art (or even mount art traditionally, if the print is just slightly smaller than the frame). They are especially useful if said art is rather heavy.
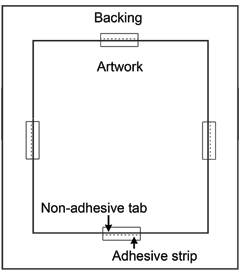
Two strips of hinging tissue are used for this method. The first is affixed to the top back corner of the artwork, and extends onto the mounting board. The second strip is placed perpendicular to the first, across the mounting board just below the edge of the artwork. This second piece helps hold the first in place once the art is hung.
|
Example of a float mounted artwork.
The back of a raised float-mounted artwork
|
| OTHER MOUNTING METHODS
|
|
|
The small tabs most commonly seen in old photo albums are a great archival method of mounting art. Ideally, they are used with a mat, since without, the corners will often show in the edges of the frame.
Although all four corners of the artwork must be secured with this method, it is possible to space the tabs so the artwork is not tight between them, but has some room to "breath" and expand (though not enough that it falls out if it contracts).
Corners are available in various colors, most commonly black, white, or clear. They can also be made quite easily by folding strips of paper and using glue or double sided tape to adhere them to the mounting board.
If you are framing something for the long term, make sure you purchase acid-free or Conservation corners, to avoid causing discoloration on the edges of your artwork.
Available from various companies, these mounting strips are stuck onto the backing board alongside the edge of the art. They have a clear or white tab attached to the adhesive, which sticks out over the edge of the art, but is largely invisible.
These strips must be concealed behind a mat, since the strips extend past the edge of the artwork. Since one should be placed on each side of the artwork, buckling may still occur.
FULL ADHESION
Though not recommended, completely adhering the artwork to the backing board is another way to mount your artwork. This may be an option if the print is an inexpensive photograph or will only be shown for a short period of time and then discarded. This method is absolutely not archival.
Double sided tape can be applied around all the edges, or a thin layer of glue can be spread over the back of the print. Any of the above display methods may then be used.
Never, ever use this method on original artwork, or on prints you want to keep for for a long time.
|
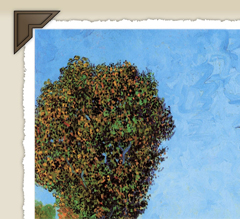
Photo corners
Adhesive strips
|
| ORDERING YOUR FRAME
|
|
|
At KeenART Media, you can order all the items you'll need to professionally mount and frame your artwork all by yourself.
- Choose the perfect Picture Frame.
- Pick the ideal matboard color and size for your artwork.
- When placing your order, select the type of plexiglass and color of foam backing you prefer.
- We hope to soon offer hinging tissue and other mounting adhesives. Until then, we recommend this Self-Adhesive Mounting Tissue. No wheat paste required, but it still comes off easily with mineral spirits, and is completely acid-free.
If, at the end of the day, you want to leave the work to someone else, we are happy to do the mounting and fitting for you. Just check "Fitting" when ordering your frame, and mail us your artwork or send us the digital file. We'll print your images and ship you the completely display, ready to hang!
|
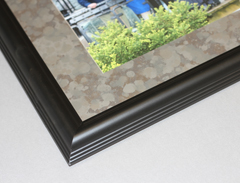
The finished artwork
|
|
Once your artwork is beautifully mounted in the frame, it's time to finish up the display and hang it on the wall. We have articles addressing these steps as well!
If you have any questions about the mounting and fitting your artwork in a frame, or any of our other products or services, please do not hesitate to contact us. Our knowledgeable staff are always happy to answer your enquiries and provide suggestions or advice.
|
|
© 2002-2024 - KeenART Media Ltd.
|
|
| |
|