Canada Print On Canvas, Custom Made Wood/Metal Frames, Block Mounting & Handmade Oil Paintings
   Toll Free: 1-888-533-6278 (KeenART)      Deals  
  My Account     My Uploads     My Cart  
Products & Pricing -> Custom-Made Frames -> Resources
 Wood Frames  Metal Frames  Mat Boards      Adv. Search
 :: Resources :: 


Picture Framing
Articles Glossary
Giclee
Articles Glossary
Printing
Articles Glossary
Photography
Articles Glossary
Art
Articles Glossary
Fabric
Articles Glossary
Laser
Articles Glossary

 SEAMLESS PATTERNS
Adding a pattern to your designs can make something plain and ordinary into something lively and unique. Patterns can be found printed on textiles, paper and tech accessories. Seamless or repeated patterns are designs that join from edge to edge to create a continuous image that can be printed on large substrates such as fabric or wallpaper.

Seamless patterns are very useful to designers because they can be repeated quickly and easily which can save a lot of production time. They can be scaled to print on large material like fabric or reduced to print individual items like cell phone cases.

In this article, we will outline the basics on how to make a seamless pattern and what you need to know when making your own pattern.


SUMMARY

WHAT IS A SEAMLESS PATTERN?
THE BASIC RULE
TUTORIAL
EXAMPLES
A seamless pattern is a design that can be repeated continuously. It will form a seamless image of one or more elements. The elements usually have a theme or color scheme that coordinate with each other. The most impotant thing to remember is match up the edges of your design. If the edges of your pattern do not match up it will not be seamless. We explain how you can make your own seamless pattern in this easy tutorial. A gallery of some patterns that we made that you can try making too!


 WHAT IS A SEAMLESS PATTERN?
A seamless or a repeated pattern is a design that continually repeats without any breaks. When you look at a seamless pattern you won't be able to tell where it began and where it ends. Striped patterns and polka dot patterns are probably two of the most recognizable repeated patterns we see today. They are very easy to make since they only require one element to be repeated. However, designers are now creating more intricate patterns that have more than one element.

Patterns start off as one single image and then it is repeated and blended on the sides. You can blend the images vertically (top to bottom), horizontally (left to right), or blend all four sides to make a seamless pattern.

You can find floral patterns, patterns with animals, and patterns of your favorite cartoon characters printed on different media. These patterns seem like they are complicated to make but there is a simple way you can make these patterns, too.

Vertical Pattern (repeats from top to bottom)
Vertically Seamless Pattern

Horizontal Pattern (repeats from left to right)
Horizontally Seamless Pattern

Seamless Pattern
Seamless Pattern


 THE BASIC RULE FOR MAKING A SEAMLESS PATTERN
The most important thing about making repeated patterns is matching up the sides so they join together seamless. Think about it as a jigsaw puzzle, all the pieces must fit together to create the image. You have to consider what will bleed off the edge, how it matches up to the opposite end, and how it will look once the pattern is made.

The left and right edges must match up for horizontal patterns, top and bottom for vertical patterns, and all the edges should match up for intricate seamless patterns.

Let's take a look at the star pattern. If we look at the original design, and take out everything in the middle, we can see where the stars are matching up. The stars on the left side are exactly the same as the star on the right and the stars on the top are exactly the same as the stars on the bottom.

The stars that bleed outside of the grey background will be cropped out. If we lined up the opposite ends correctly, when the pattern is repeated, the two ends should join to create a seamless image.

Vertical Pattern (repeats from top to bottom)
Where do the stars line up?

Horizontal Pattern (repeats from left to right)
The stars outside of the grey background will be cropped out.

Seamless Pattern
The edges should match up when you put it together.


 HOW TO MAKE A SEAMLESS PATTERN ON ADOBE ILLUSTRATOR
STEP ONE

Pick the style of pattern you want to make.

If this is your first time making a pattern, it would be best to go with something simple that uses simple shapes that you can easily repeat. Once you have decided on the design, you would need to make the elements that will appear in your pattern.

For this example we will be making a floral pattern.

STEP TWO

You would need to make the graphic elements that will appear in your pattern. For this tutorial, we have made some simple flowers and leaves that we will repeat in our pattern. At this point, you would also pick your color scheme.

The elements can be made in Illustrator or any other vector-based editing software you have. You could also draw your design and scan it in. You just need to make sure they are vector files. This is to preserve the image quality when you are scaling it.

STEP THREE

Now that you have the elements ready. You would need to set up your file. Most patterns usually start off as squares, but you can also make a rectangular design; it all depends on how you want the pattern to look.

Open a new document. The document size isn't very important but it should be larger than your pattern. You just need enough space to work within. We will be making a square pattern so our document will be a square.

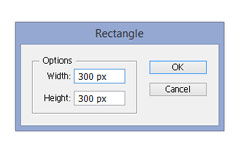
Now you would need to make a square with the rectangle tool. Click anywhere on your document to make the size option window appear. We will be making a 300x300 pixel square.

The dimensions of our square will tell us where to place the elements that bleed out. In this case, we know our square is 300x300 pixels, so we would either be moving the elements 300 pixels horizontally or vertically. This will keep everything lined up and make your pattern seamless.

After you square has been made go into the layers window and lock the layer that the square is in. This is to prevent anything from shifting that could affect the pattern.

STEP FOUR

Now that you have set up your file, you can begin placing your elements on the edges. To make things simple, only place the elements on the left or top edge. When you have placed one element on the edge, you will need to duplicate the same element over to the opposite edge.

We will put a flower that goes over the top edge and then duplicate it to the bottom edge. Once the flower is positioned on the top edge, right click the flower and go to transform -> move (CMD+SHIFT+M or CTRL+SHIFT+M). The move window will appear and you can precisely move your flower to the bottom edge. Make sure the preview option is checked off, so you can see if it is going to the correct place.

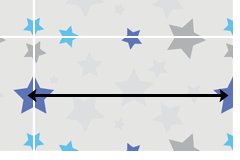
Since we are moving up and down, you will keep horizontal at 0px. We know our box is 300px, so we will need to change the vertical dimension to 300px. You should see your vector move down. If it has moved to the right spot click copy and the element will be copied and moved over.

Now place an element on the left edge, right click it and go to transform -> move. You will keep vertical at 0px but horizontal should be 300px. Remember to click copy so that your element is duplicated and moves over. If you do not click copy it will only move your element.

After you have placed the elements you want on the edge. You can do almost anything to the center as long as it doesn't bleed over the edge. If it does, you will have to duplicate it to the opposite side to insure it stays seamless.

STEP FIVE

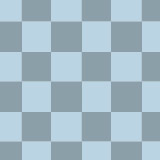
Your pattern is now complete. If you are happy with it then the next step is to turn it into a pattern swatch. You can use the swatch to fill in shapes with your pattern. You will also need to do this in order to test if your pattern is seamless.

You can choose to remove the square so you can have a transparent background, this will allow you to use any background color you want, or you can leave it as it is. In our case, we want our pattern to have a transparent background. We won't be deleting our square completely, because we need to tell Illustrator where to cut off the elements that bleed off the edges.

To do this, you need to unlock the layer that your square is in, select it your square, and remove the fill and stroke. Everything inside the square will remain, and everything outside of it will be cut out. Select all your elements (including the square), and go to the edit menu and click on "define pattern". Name your pattern and hit OK. Your new pattern will now appear as a swatch. You can use the swatch to fill in shapes to see how your pattern turned out!

If you noticed a thin line going through your pattern. It is completely normal. This is how Illustrator renders the graphic. If you zoom in and out and it disappears then it is good to go. If it doesn't then you would need to go back and make sure the elements that were outside of the box are the exact distance from each other.

You will need to make the elements for your pattern
Graphic elements that will be used.

Make a square with the rectangle tool
Make a square with the rectangle tool.

Right click your element and go to transform -> move
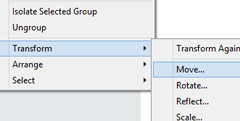
After you place your element, right click and go to transform -> move

The move window will show you where your elements are being positioned
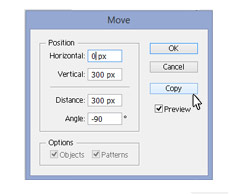
The move window will help you position your elements.

Move your graphic according to the size of your box
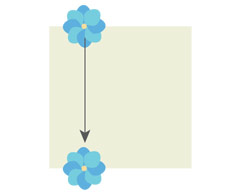
Your element should move exactly 300 pixels down (or whatever the height of your square is).

Arrange the elements in the center
After you have placed all the elements around the edge you can arrange the center however you want.

Create a new swatch with your design
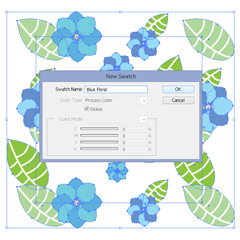
Select all your elements and go to edit -> define pattern.

Fill any shape with your new pattern!
Your pattern is now ready to use!.


EXAMPLES

Chevron Pattern Argyle Pattern Polka Dot Pattern Morrocan Pattern Triangle Pattern
Dashed Line Diamond Pattern Polka Dot Pattern Stripe Pattern Checkered Pattern Diamond Pattern
Polka Dot Pattern Argyle Pattern Quatrefoil Pattern Scale Pattern Stripe and Checkered Pattern


Once you have created a library of your own patterns, you can make prints on all types of materials. You can print it on a canvas and use it as a focal point in a room, or print it on our Removable PhotoTex and you have your own wallpaper!

If you have questions about any of our services or products, don't hesitate to contact us. Our knowledgeable staff is always happy to assist with answers, advice, or suggestions.

 
Quick Info
Home
Contact us
My Account
About us
Sitemap
Social Media
Blog
Twitter
FaceBook
Instagram
TikTok
Legal
Terms & Conditions
Privacy Policy
Help
FAQs / all
Resources
How it works?
Canvas Edge Options
Order Problems?
Order
Pro Account
Discounts / Newsletter
Payment Methods
Testimonials
Shipping

 Paypal
 Visa
 MasterCard
American Express
Canada Giclee On Canvas, Fine Art Printing - Art Scanning & Reproductions - Handmade Oil Paintings - Custom Wood Panels, Metal Picture Framing - Block/Plaque Mountings, Large Format Dry Mounting & Lamination - Art Supplies: Stretcher Bars, Cradled Wood Panels and Artist Canvas - Collages On Canvas - Plexi/Acrylic Face Mounts - Block Acrylics, Fabric Printing, Dye Sublimation - Cityscape Skyline Prints, Resin, Photo Gifts and more...

Vancouver Canvas Prints - Toronto Photos On Canvas - Calgary Photos On Canvas - Canada Laser Engraving & Cutting Services


© 2002-2024 - KeenART Media Ltd.