| THE FRAMELIGHT SHADOW BOX |
 |
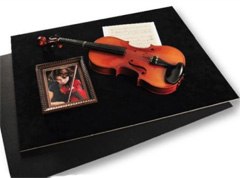
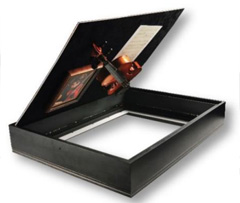
| The FrameLight is a shadow box with track lighting around the inside edge to brighten and highlight meaningful art, antique objects, or other significan memorabilia. Completely customizable with any picture frame, the FrameLight is easy to set up, simple to hang, and creates a beautiful and lasting home decor accent in the living room or front hall.
You can buy your FrameLight from KeenART Media through our easy online ordering system. We offer the FrameLight on its own, or you can outfit your display with one of our many frames, top-grade plexiglass, and an optional mat.
|
SUMMARY
Thinking of ordering a FrameLight and not sure what's involved? Read on to learn more.
- Preparation
- Assembly
- Step One: Attaching the Picture Frame
- Step Two: Wiring
- Step Three: Inserting the Art
- Step Four: Finishing
- Step Five: Hanging
|
| PREPARATION: THE FRAME |
|
|
Because the FrameLight does not come with its own frame, the customer has the opportunity to select any frame moulding they want for their display. This remedies the limitations of regular shadow box displays, where choice is restrained to picture frames with a rabbet of 1" or more.
As a result, the perfect frame can be selected, that matches the customer's art and decor. Highlight a family heirloom or antique thrift store find with an ornately carved, golden Victorian frame, or accentuate the wood of an old instrument with a smooth, natural wood moulding.
If you are ordering both the picture frame and the FrameLight from KeenART Media, simply choose a frame of the same size as your FrameLight and let us know it is for the shadow box. This way, if the dimensions need to change based on the width of the frame, we can determine this in house and let you know.
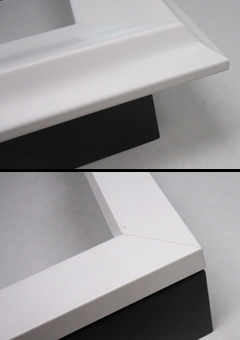
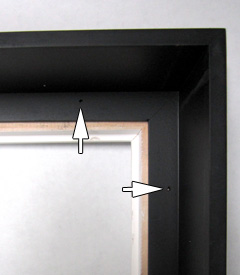
Your picture frame will be sized to ensure the front edge of the FrameLight base is completely hidden. Depending on the width of the chosen frame, it may extend over the outer edge of the base, or it may lie flush with the sides of the base. If you prefer one or the other, you must choose a specific width of frame.
The flat front of the FrameLight is 1-1/2" wide. Any frame selected must be at least 1-3/4" wide to ensure space for the lip (where the plexiglass sits) and proper coverage. A frame exactly that width will lie flush with the outer edge of the base. A wider frame will extend over the side of the base, allowing the FrameLight to be inset behind the frame.
If you are ordering a frame from elsewhere, or already have one at home, it is important to note that your plexiglass and optional mat must be held within the picture frame with framer's points or finishing nails. Because the lip of the frame will reach beyond the edge of the FrameLight base, without this hardware, your plexiglass will simply fall out of the frame.
|
Given dimensions are from edge to edge
Top: a wide, 3-1/2" frame; Below: 1-3/4" frame
|
| PREPARATION: THE ART |
|
|
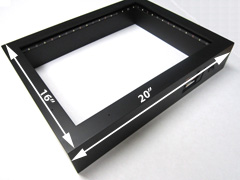
The objects that will be displayed in the FrameLight shadow box must be securely adhered to a mounting board to ensure they remain in place for as long as the frame is displayed. The board must be cut to 1" less than the shadow box dimensions on each side (15x19" mounting board for a 16x20" box). Depending on the weight of the each object, different methods may be used to attach them to the backing, which may be a thin hardboard or foam board, depending on the total weight of the items.
Small, delicate pieces can be sewn in place with fishing wire or other thread. Paper documents may be pinned or, if preservation is not required, glued. Smaller framed images or items with secure loops can be hung on picture hangers affixed with adhesive or pinned through the back of the mounting board.
Be sure to leave at least an inch of space between the objects and the edges of the mounting board to allow for placement and visibility (otherwise the lighting chase will interfere with the objects). If using a mat, more space around the edge may be necessary so that no item is obscured. If the frame has been assembled at this point, consider setting it over the layout prior to attaching the items, to ensure proper visibility.
However the items are assembled and attached, it is important to ensure they remain in place when the mounting board is flipped upside down, as this is how the board must be placed in the frame. If the piece stays intact in this position, it is also a good indication that it will hold for many years to come.
You can purchase a foamboard mounting board from KeenART when you order your frame and we are happy to cut it to the necessary size. Alternately, you can order pre-cut foamboard from our online Art Supply store. We also offer pre-cut birch plywood panels for mounting heavier objects.
|
Attach the art to a mounting board
|
| ASSEMBLING THE FRAMELIGHT BOX |
|
Please note: These instructions include attaching the picture frame moulding to the FrameLight. If you received your FrameLight with the picture frame already attached, skip Step One.
STEP ONE
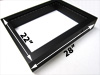
The FrameLight is made up of two separate box frames. Remove the inner frame - called the lighting chase - leaving the outer frame. This is the "base frame" to which the moulding will be attached.
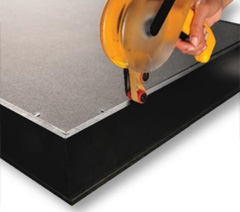
Turn the picture frame (with the glazing and mat already in place) upside down. Place the base frame on top of the picture frame and mark through the screw holes. The holes will be located every few inches along each side of the base.
Remove the base and drill starter holes at each mark. Then return the base to the frame and drill screws (not included) through each hole in the base. Be sure to check the length of the screws to ensure they are long enough to hold securely, but will not push through the front of the frame.
STEP TWO
Before fully replacing the lighting chase (inner frame), connect the wiring. Simply plug the red pins to the red slots. If your FrameLight came with the frame attached, the wires should already be connected. (See image)
Once the wires are connected, carefully replace the lighting chase, ensuring the wires are tucked in the space between the chase and the outer base, where they will not be seen.
STEP THREE
Once the lighting chase has been replaced, you will notice it is set lower than the edge of the outer base to which the frame is attached. The mounting board holding the art will rest on this ledge so the back of the board is even with, or slightly lower than, the raised edge of the base.
After ensuring the wires are connected (step two), gently turn the mounted art upside down and insert it into the base. If the mounting board is the correct size - one inch smaller than the FrameLight dimensions - it will fit perfectly into the space and lie neatly between the raised back edges of the outer base.
Before dong this, consider blowing compressed air along the glass and sides of the base frame, or use a dry microfiber cloth, to ensure no specks of dust will be forever trapped in the display
STEP FOUR
Insert framer's points or finishing nails into the sides of the base, so they lie flush against the back of the mounting board (see image). Place them fairly close together - depending on weight of the art, it may be necessary to place one every two inches or so.
Run two sided tape or another adhesive around the outside edge of the base frame, and apply a dust cover or kraft paper. This will ensure no dust, debris, or unwelcome insects work their way into the space. Trim the paper neatly so it is even with the edges of the base.
STEP FIVE
Use screws to attach the supplied hanging hardware to the top back of the base. The exact size or number of hangers supplied may depend on the size of FrameLight ordered. Remove the panel on the side of the base and insert the AA batteries (three or six depending on the size, not included).
Hang the FrameLight using wall fixtures approved for its weight. Flip the switch to see the enhanced beauty of the evenly lit display. The lights are designed to shut off automatically after one hour.
|
Place screws through base holes
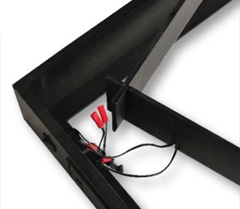
Ensure the wires are connected
Carefully insert the mounted art
Use framer's points to hold the art in place
|
| ORDER FRAMELIGHT ONLINE
|
|
| The FrameLight is a great way to add a sophisticated and original touch to your art arrangement in any room. From baptism dresses to signed baseballs, any three dimensional memorabilia that might be displayed in a shadow box - and even some items that never have been - can be enhanced and made into a beautiful focal point.
At KeenART Media, we have a wide selection of custom picture frame mouldings that can be cut to fit any size of FrameLight. We also offer many traditional shadow box frames if you prefer the classic deep frame style.
If you have any questions about our products or services, please don't hesitate to contact us. Our knowledgeable staff is always happy to offer advice and suggestions for any of your printing, framing, or finishing needs.
|
|
© 2002-2026 - KeenART Media Ltd.
|
|
| |
|