| HOW IT'S MADE: GICLÉE GALLERY WRAP CANVAS PRINTS |
 |
| Giclée (pronounced gee-clay) is a fine-art printing process that uses digital images, high-end printers and archival inks, to print on superior quality paper or canvas material. The word Giclée literally means "to spray," which refers to the way the printer sprays the ink onto the canvas. Although all ink jet printers do apply ink by a spray technique, not all ink jet prints are Giclée. This relatively new process has become very popular with artists and photographers and, over recent years, has caught the eye of many people simply looking for a good-quality print that will last generations.
|
SUMMARY
There are various steps required to create a Giclée canvas print, and the result is a beautiful, high quality piece of art that will last for generations. The article below outlines the following steps in detail.
- The Giclée printing process: Archival, pigment-based inks and ink jet printers are used to produce a clear, sharp image from a digital file. A wide variety of substrates can be used, including paper, canvas, and fabric.
- Digital edge selection: A wide selection of sidebar options make it easy to choose the best match for your unique image. Pick from Image Wrap, Pixel Wrap, Mirror Wrap, and others.
- Coating, stretching, and finishing the piece: Protective coating is applied to keep your canvas looking like new. It is then stretched onto a wooden frame and finished by hand right in our warehouse.
- Reproduction of original two dimensional artworks: Once an original painting or drawing is scanned, the print technician must use a color matching technique to ensure the printed image will match the original as closely as possible.
|
| PRINTING
|
|
|
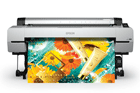
Since Giclée is a digital printing process, it must begin with a digital file. This file can be a photograph from a camera, a digital reproduction made by a scanner, or a design created using exclusively digital media. The ink jet printers used for Giclée are of a professional quality, and while large or wide format is most common due to the range of sizes they can produce, smaller, desktop printers are also available. Any ink jet printer can produce a Gicleacute;e print, as long as a company has produced archival inks for that printer.
As long as the image being reproduced is high resolution - no visible pixels, not blurry, sharp distinction - the spraying action of the printer can create a continuous tone and crisp detail with no visible dots in the finished image.
Giclée inks are pigment based, and use water as a binding agent; they are also called "aqueous inks" and which are archival and fade-resistant (UV resistant) by definition. These high quality inks allow for a wide color range, or "gamut". Most printers used for Giclée can print on a wide variety of surfaces which, in the print world, are called "substrates". These substrates include fine art and photo papers, vinyl, canvas and transparent film.
For the purpose of this article we discuss Giclées printed on canvas. Printing on canvas is unique in terms of texture and durability. It is also the only type of material that can be stretched and mounted like traditional painting.
|
An Epson ink jet printer
|
| SELECTING YOUR EDGE
|
|
When preparing the digital image for printing, the print technician must leave enough space around the displayed image to wrap around the edges of the stretcher bar frame. This extra canvas can be anywhere from one to two inches on each side of the image, depending on how deep the frame is.
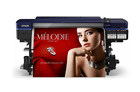
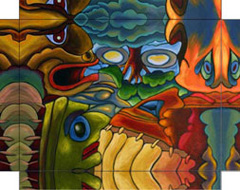
IMAGE WRAP
One way to create this edge (also called the "side bar") is to increase the size of the image. This allows the outermost inches of the print to be wrapped around the frame, resulting in an uninterrupted view of the image. Because nothing is being added to the image, this style will crop the picture slightly - the edges of the print will not very visible in the final display. Therefore, if any important details are along the edges of your picture, this is not the option for you.
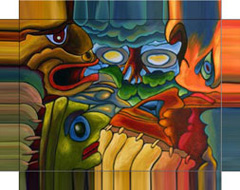
MIRROR WRAP
If you want your image to continue around the edges of the stretcher bar frame but you do not want to lose any part of your image, a mirror wrap is the best choice. The outer edges of your picture (however much is needed to wrap around) will be mirrored. Your image will appear to continue around the canvas, but actually be a repeat of the edge visible on the front. This option can be problematic if a person or body part is on the outer edge of your image - you could end up with a hand or half a face on the side of your canvas.
PIXEL WRAP
If neither of these styles suits your image, where is still one more option that allows the colors of your image to continue all the way around the canvas. This style is called pixel wrap because the very last pixel (colored squares that make up your image) will be stretched to form the wrapped edge. The result, if your image has many colors, is a striped side border. If parts of your image are a solid color, the Pixel Wrap will look very much like an Image Wrap, but with no detail.
SOLID COLORS
Finally, if you do not want your image to continue around the edges of the canvas at all, either because you plan to frame it, or you simply prefer a blank edge, a wrap using the average color, white, or black is the style you need. For the former, the editing software will select the average of all the colors on your canvas (if it is brown and green, your average color is a brownish-green) and uses this color as the edge.
A black edge is ideal if you are framing your canvas in a Floater Frame. The edges will not be visible anyway, and the black will blend in with the shadow created by the frame. White edged canvases are common in galleries, and minimize distraction while highlighting the image. They are popular for images that have lighter colors near the edges, or digital designs on a white background.
There are a few other edge styles that are not as common, but may be the perfect fit for your image. Take a look at all our edge options and choose one that is best for you. We also offer the "artist's choice" option, which leaves the decision up to our talented graphic designer.
|
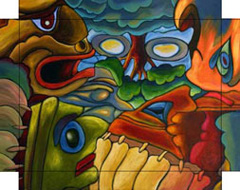
Image Wrap
Mirror Wrap
Pixel Wrap
|
| POST-PRINTING AND FINISHING
|
|
COATING
After the image is printed, it must be coated to provide extra protection from sun, water damage, and cracking. The print technician will spray this coating evenly on the canvas and allow it to dry in a dust-free room. The coating is transparent and water-based. It does not affect the colors of the print, and will not prevent the artist from painting over or signing the canvas.
STRETCHING
The next step is stretching the canvas. First, the framer builds a stretcher bar frame to fit the dimensions of the printed image. This frame is made from lengths of wood - often pine - which have been mitred (cut at 45º angles) and nailed together at the corners. Cross-bracing bars are used for large frames to prevent buckling.
The canvas print is placed face down, and the frame is placed on top. The framer then holds the edge of the canvas with canvas-stretching pliers, and folds it to the back of the frame, stapling it in place. This action is repeated on all sides of the frame, with the canvas pulled taut every few inches. The framer uses a staple about every quarter inch to distribute the tension. The corners are dealt with last, and are folded using a special technique that leaves no visible flaps on the outside edges.
FINISHING
In order to finish the canvas, the framer or framer's assistant covers the staples with cloth framing tape, applies bumpers to the bottom corners, and hanging hardware. The bumpers are small squares or circles of soft material (felt, foam, or rubber) that protect the wall from scratches and ensure the canvas hangs evenly. Depending on the size of the canvas, the hanging hardware may consist of D-ring hooks and framing wire, or sawtooth hangers. Your gallery wrap is ready to hang!
Need Extra Hardware? Order Online!
|
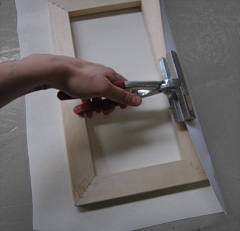
Canvas being attached to the frame
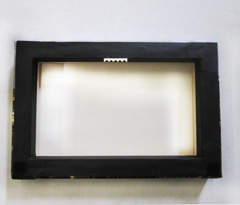
The back of the canvas is taped and hardware is affixed
|
| GICLÉE AND ART REPRODUCTION
|
|
|
Sometimes instead of a digital image, the customer will bring in an original artwork on canvas or paper. When reproducing a piece of fine art from an original, there are a few more steps before the printing process.
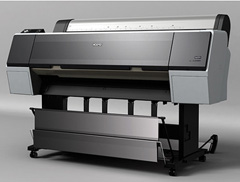
First the artwork must be scanned. The quality of the scanner is very important in insuring a good reproduction, just as the quality of a camera is important for photograph. It is possible to use either a flatbed or a drum scanner, but only a flatbed scanner can accommodate a stretched canvas or other rigid material.
The high quality scanners used in print shops can to record digital images at various resolutions or dpi. Dots Per Inch translates into how many dots of color the printer can spray in one square inch. A resolution of 300 dpi or higher is needed to create a Giclée print.
COLOR MATCHING
In order to make sure the finished piece looks as much like the original as possible, the print must be color-matched to the original. In order to do this, the technician prints small sections of the image - called hard proofs or test strips - and compares them, at the same size, to the original. This step is required because no matter how accurate the scanner and printer, there will always some difference between how our eyes see the original and how the scanner sees it.
Sometimes several rounds of altering the colors and printing test strips are necessary before the reproduction will be exactly right. Each time the image is printed on a different printer, or a different paper, it will need to be color-matched again.
|
An Epson scanner for reproductions
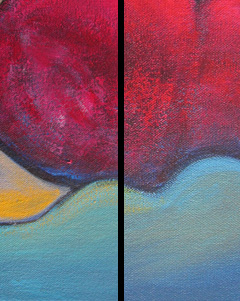
Left: Original. Right: Giclée Print
|
| Whatever your picture, size, and edge selections, creating your print with the Giclée process is sure to result in an artistic piece of decor that will grace your walls for generations. Intended to last 100 years with proper care, Giclée prints are the best choice for professional reproductions, family and special event photographs, and your favorite nature or cityscape images.
contact us. Our knowledgeable staff is always happy to answer your questions and provide advice and suggestions for your next one-of-a-kind Giclée print.
|
|
© 2002-2024 - KeenART Media Ltd.
|
|
| |
|