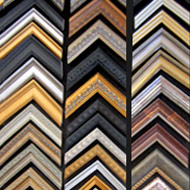
1. The choice between standard and custom picture frames
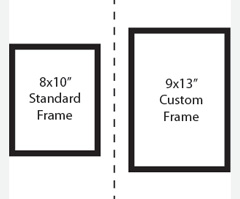
Though the space you have is an important factor when choosing a frame size, considering the popularity of the size is also significant. If you select a standard picture frame size, you'll probably be able to pick up a frame at most retail stores. If you choose a less common size, you'll probably need to order a custom frame, which gives you tons of selection, but can cost a fair bit more. 8"x10" (5"x7" with a mat) is an example of a standard frame size, while 9x13" will be custom.
For more information, read our article on Custom vs. Standard Frames.
2. Make sure you understand what all the measurements mean.
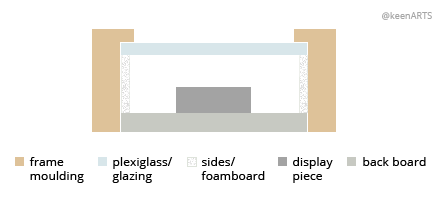
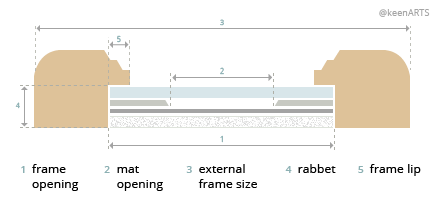
When ordering a picture frame, or determining the size you need to pick up, a number of measurements come into play:
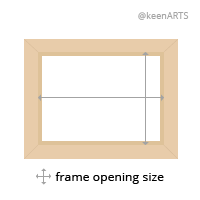
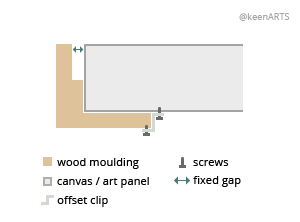
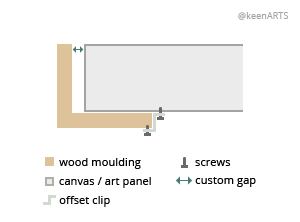
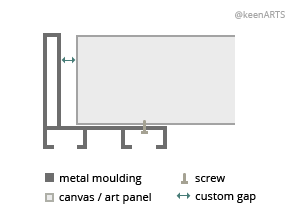
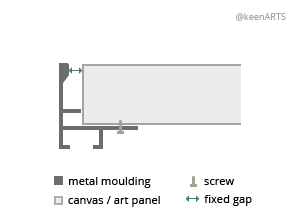
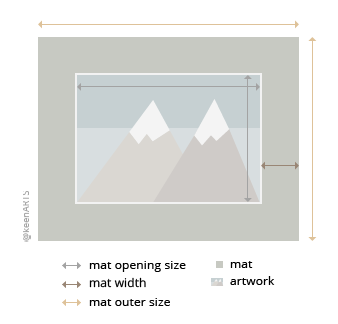
- Height and Width. Height is the measurement of your artwork from top to bottom (when sitting at the orientation it will hang). Width is the measurement from left to right. For most picture frames, if it says "8x10", it is referring to the picture size.
If you are measuring the picture frame itself, you'll want to measure from the back, behind the lip. In order to keep your artwork from falling through the frame, the actual window opening is usually 1/4" to 1/2" smaller (ie: 7.5x9.5").
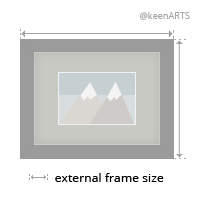
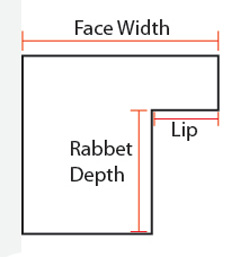
- Outside Frame Dimensions. Though not always mentioned, the outer frame dimensions can be important if you're hanging the piece in a narrow space. This is the height and width taken from the very outside edge of the picture frame.
If you know the face width - the width of the picture frame moulding arm - you can figure out the outer dimensions by doubling it and adding that to each dimension.
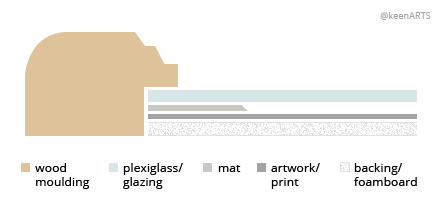
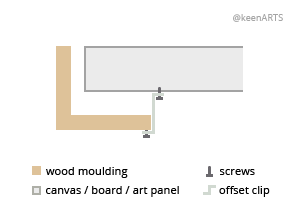
- Rabbet Depth. This is the thickness or depth of the frame from behind the lip to the back of the frame. It is an important measurement to make sure your contents (glass, mat, art, backing) are not to thick to fit in the frame.
A good custom frame shop will always let you know the rabbet depth of the frame.
For more information, read our article How to Measure Your Artwork
3. Always double (or triple) check.
If you're ordering a custom frame online, you want to be really, really sure you've measured your artwork right. If the frame doesn't fit but matches the dimensions you specified, you could end up having to order a whole new frame, not to mention the extra wait time. Even if you picked the frame up at a store there's the hassle of having to return it.
If you've received the wrong size frame from KeenART Media, the last section in our How to Measure Your Artwork article explains what to do.
4. Make the "archival or not" decision early.
If you want to make sure your artwork remains in like-new condition for generations, you'll probably want to use archival methods to frame it. This includes buying acid-free mounting products and UV-filtered glazing, and hinging the art with acid-free tissue in a way that can be reversed without damaging the artwork.
For more information on archival or "conservation" framing, read our article: Conservation Picture Framing.
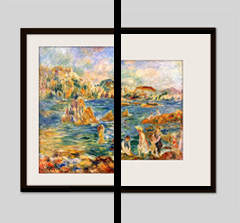
5. Choose the perfect frame.
At the most basic level, choosing the best picture frame involves picking something that complements but doesn't overpower or clash with the art. It's unlikely you would frame a Renaissance print in a thin, shiny black frame, just like you probably wouldn't frame a stark, modern abstract in a gilded, ornately carved frame. The frame is there to draw attention to the art, not away from it.
When choosing frames, you don't necessarily need to pick the exact same frame for each and every artwork in your home. If you decor preferences allow, don't be afraid to select unique frames that show off your eclectic taste in art.
For more on picking a great frame, see our article on Frame Selection.
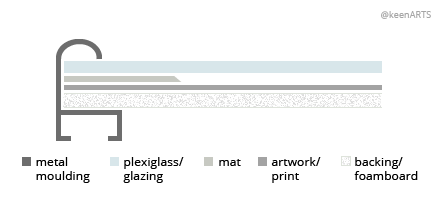
6. Don't discount a metal frame
When people think of beautiful, lasting picture frames, they're usually imagining a solid wood frame. But if you're into modern art and maybe you don't have an unlimited budget, a metal frame can be an excellent and affordable option. Metal frames are naturally archival (they have none of the acid in wood frames), easy to assemble and disassemble, and come in narrow widths unattainable in wood frames.
7. Choose the perfect mat.
Though, like a frame, mat width is all about personal preference, the chart below outlines the "ideal" mat width for different picture sizes. "United Inches" is the sum of the height and width of your artwork (an 8x10" frame is 18 united inches).
UNITED
INCHES |
MAT BORDER
WIDTH |
| 6" or less |
3/4" |
| 7" - 8" |
1 " |
| 9" - 10" |
1-1/2" |
| 11" - 24" |
1-3/4" |
| 25" - 32" |
2" |
| 33" - 36" |
2-1/4" |
As for mat color, follow the same guideline as frames. The mat is there to create space between the frame and the art, and to draw the eye in. Feel free to choose a colored instead of white mat, but take care not to let the mat outshine a simple artwork with a shiny finish or bold pattern.
See the full article on Choosing the Best Mat Size. To learn more, read Choosing the Best Mat Color.
8. Make time to get the perfect match.
If you're ordering your frame online, strongly consider getting some samples before you order the full frame. There's no guarantee the color on oyur computer monitor is the color of the actual piece, so holding your artwork up to the screen isn't that helpful. Frame samples cost between 2 and 4 dollars, and at KeenART Media we will refund your shipping cost if you place a full order afterwards.
To order a frame sample, navigate to the bottom of the frame order page to where it says "Need sample?".
9. What to do if your frame is the wrong size.
If your frame is the wrong size for your art, don't toss it just yet. There could be a way to solve your problem without wasting a whole frame!
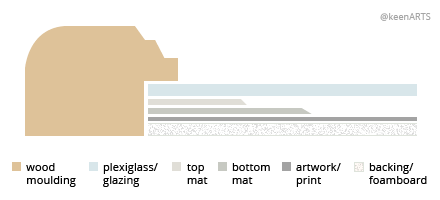
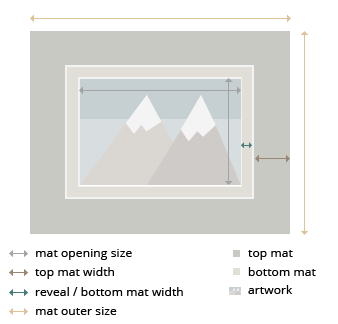
- If the frame is too large, add a mat. If you already have a mat that is also too large, you can either add a mat reveal underneath (a second mat that sticks out just 1/4" or so), or buy a new mat that is wider. Replacing the mat is much less expensive than replacing the frame.
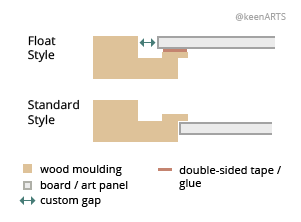
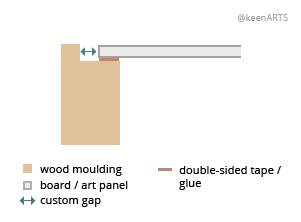
- You can also choose to float mount your artwork. This involves mounting the art on a backing board which will be visible between the edges of the art and the edges of the frame. You may want to deckle the edge or trim off a white border.
- If the frame is too small, your options are more limited. If it's possible, you can crop the image, but this isn't recommended for art of any sentimental or monetary value. If the art you have will absolutely not fit in the frame and you can't return it, figure out a different use for the frame. You can never have too much art on display!
10. Learn to properly hinge your artwork.
Even if you aren't concerned with archival framing methods, you might want to consider hinging the art to the mounting board in a conservational manner. Affixing the paper only at the top allows it to expand and contract in the inevitable humidity fluctuations, and if you use hinging tissue, you'll be able to easily remove the art and display it in a different way later.
To learn all about this method, see the Mounting Art section of our Conservation Framing article.
11. Protect your frame when building or loading.
Once you've received your frame, you'll need to fit your artwork into it. If you've ordered a metal frame, you will need to remove one arm to slide the art in. Always be sure you're flipping your frame face-down onto a clean, smooth, dry surface. Dirt, food scraps, even tiny particles of dust can result in scratches and nicks on the neat face of the frame. Make sure your work space is large enough, too, so the frame doesn't topple onto the floor.
12. Make sure your art stays as bright as the day it was made.
Fading is one of the most common detriments to framed artwork. It's impossible to completely prevent this on paper artwork, unfortunately, but you can slow it down by a hundred years or so.
For prints, if you have an option choose a company that uses Giclée inks. These special, archival inks are stable in UV light.
If your budget allows, always choose UV-filtering acrylic or glass for your frames. Good quality brands protect against around 98% of the UV light that strikes the glazing.
Although the living room wall directly across from the window that lets in the blazing afternoon sun may be beautifully lit and empty, it's not the best place for quality framed art. That much regular exposure to UV light is going to fade your artwork more quickly. Your best bet is to hang something there that won't fade or isn't as vital if it does. Save the special artwork for spaces with a bit more shade.
13. Hang your artwork at the perfect height.
Of course you can hang your artwork however you wish - it's your wall! But professional guidelines can be a great assist if you're not quite sure the best vantage for your new frame.
Hang your artwork so the center of the piece (or the focal point, accounts vary) is 57" off the wall. This is considered the average eye height for human beings, and this is the best level for admiring the entire piece.
Apartment Therapy breaks down this hanging process in their helpful article How to Hang Your Artwork.
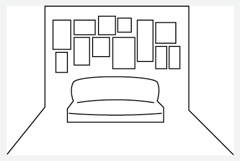
14. Space your frames flawlessly.
If you want to display multiple frames as a complete set, you'll probably want to keep some sort of uniform spacing between them. This article on spacing frames offers a super straightforward tip for keeping everything in line: simply cut a piece of masking or painters tape the length of the space between two frames. Hang a frame on either side of the tape, then move the tape over to hang the next frame.
If all the frames are the same size, make it even easier by cutting the tape the length between the two nails, instead of the outer edge of the frame. That way you don't have to measure again for each nail.
Another point: if you are displaying six frames that will take up 3x4 feet in total, you will use this 36x48" section as a whole to determine the 57" central height mentioned in #13.
15. Don't be careless with your acrylic.
Plexiglass or acrylic glass is an excellent glazing alternative to regular glass. Not only does it prevent that greenish tinge glass sometimes causes, it also weighs about half as much and doesn't shatter if it falls.
Another way plexiglass is different that a lot of people forget is the method in which it should be cleaned. Plexiglass should never be cleaned with window and glass cleaner.
There are special cleaners just for acrylic, but if you don't want to buy a separate spray bottle for a frame or two, a soft cloth wet with plain old water will work just fine. If the glazing is particularly dirty (or greasy, if it's hung in the kitchen), you can add a bit of dishsoap to the water, as well.
To learn more about the differences between glass and acrylic, read our Acrylic vs. Glass article.
16. Don't limit yourself to the living room.
If you love art as much as we do, you might have a house full of framed paintings, prints, and drawings. But just because your walls are full doesn't mean you have to stop collecting!
If lack of space has you putting on the art brakes, think again! There are plenty of homes to be had for all your favorite artwork. Think about outfitting your office with something other than the usual stock photos of landscapes, or add some wonder to the workshop with an industrial-inspired print with a metallic frame.
If you have absolutely no walls - if even the doghouse is full up - you can always give art as a gift. That way you get all the fun of choosing the art and the frame, without the hassle of having to hammer in a nail!
17. Accent your wall with art instead of paint.
Another great way to make space for all that art is to hang it gallery-style. Rather than a single line of frames at eye level, throw out the 57" rule and decorate like the art museums of old - with floor to ceiling frames!
Gallery walls add intregue to a room and make the entire space an instant conversation-starter. It might not be a time saver when you move - you'll have holes to fill instead of deep maroon to cover - but you'll be blissfully happy while you're there.
18. Extra frames? Don't stop at paintings!
You can frame so much more than fine art on paper! Check out some of these fitting frame suggestions:
- The kids' drawings
- Relief carvings in wood, plaster, or ceramic
- Collectible spoons or cultural items
- Old photographs, float mounted to show off the rough edge
- Old notes from a loved one, or passed down from grandma
- Fabric swatches
- A chalkboard
- The wall - leave them empty for an architectural decoration
19. Switch it up - art doesn't have to be permanent.
It's easy to get into a groove of framing precious artworks, sealing up the back well enough to protect it from the apocalypse, hanging them up and forgetting about them for decades.
Permanent art is great, but it's not the only option. Consider framing some piece with turn buttons instead of framer's points and tape so you can trade them out for other pieces in a few months. This is a great option for the kids' creations, which tend to flood in, and inexpensive art prints. Remember, you can always shuffle back to your favorite. You can even leave the old ones in the frame behind the current piece so they stay safe and sound.
20. Last but not least: buy your custom frames from KeenART Media!
The most important tip of all, of course! Here at KeenART Media, we offer over 400 different picture frame mouldings, ranging from less than an inch wide to 4 inches or more.
We're proud to carry:
We have everything you need to fulfil your unique framing projects.
In addition to the products and services we offer, we also have a great Resources section, filled with tips, advice, how-tos, and general information on picture framing, fine art printing, Giclées, photography, and art.
|
1. Standard and custom frames.
2. Frame profile measurements.
5. Pick the best frame for the art.
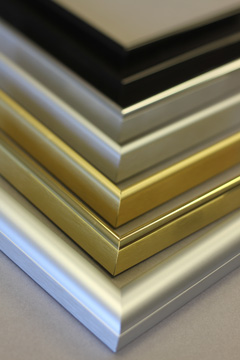
6. Metal frames are archival and less costly
7. Left: mat is too thin; Right: mat is classic size

9. Frame too big? Try a mat!
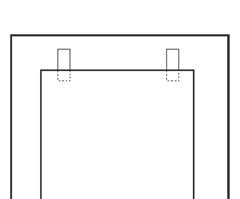
10. Hinge your art like a pro.
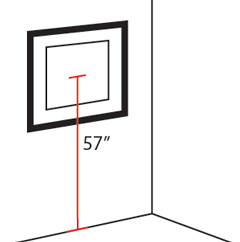
13. Your frame's center should be 57" from the floor.

16. Decorate your office with framed art.
17. Create an art accent wall.
|